| |
 |
|
|
With spotlights, you are advised to check you have made the right choice for the formwork and relevant accessories to use, since any additional modifications to the reinforced cement will be difficult, if not impossible.
Check the model of the box to use with abundance (tekpf05 or tekpf06), to then carry out convenient and vented light installation. |
| |
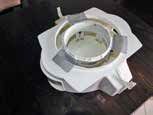
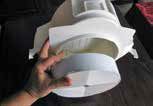
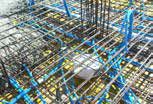
The box fastened in the reinforced cement in fact must last as long as the building, much more than the light to be installed, and thereby enable flexibility also for any future choices. The assembly ring nut (or frame) must pass from the hole in the box, if necessary you can reduce the perforated support surface prepared by the manufacturer until it passes from the hole, so that at least a small part of the sheet metal remains to enable its fastening. |
| |
|
|
|
|
| |
 |
|
|
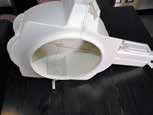
Firstly, check the size of the transformer which should fit in the prepared box, to choose the right compartment tunnel (TEKPFTSHORT or TEKPFT), to insert and hold it.
Now we can identify the light box support product to use for our lights to install. (in the case represented TEKPF06TSHORT). If the light to install is smaller than the hole on the box |
| |
tekpf05 or tekpf06 , respectively 150 or 210 mm. , choose the grill with the necessary geometric shape (R for round hole lights, S for square hole lights) |
| |
|
|
|
|
| |
 |
|
|
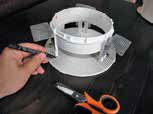
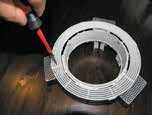
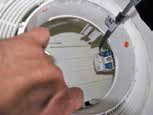
Position the assembly ring nut (frame) over the grill of the light to install, so you can mark its cutting point to contain the ring nut as precisely as possible. Then cut the grill with a normal electrician’s scissors. Fit the assembly ring nut in the just cut grill to check the good outcome of the work. The space created between the ring hut and the grill must be the least possible and then subsequently shaved. |
| |
|
|
|
|
| |
 |
|
|
Tighten the grill using normal, self-threading plasterboard screws to the perforated sheet metal passing the screws through its opening. As we have already said, the perforated sheet can be made smaller to fit it into the grill in the light support box. (the excess sheet metal would in fact obstruct this operation) |
| |
|
|
|
|
| |
 |
|
|
Carry out an overall test to ensure everything is working correctly.
|
| |
|
|
|
|
| |
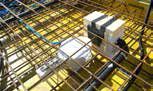
Check the height of the light if it is compatible with the standard depth of the box (13 cm) , if the light is deeper or you want to give it more depth, CHOOSE to use the TEKPFRING ..06/..50..Grill accessory chosen as follows: The RING accessory allows lifting the box and keeping the reinforcing bars close together; also increasing the depth of the box, for lights over 13 cm deep. In some cases, the structural designer needs the reinforcing bars in reinforced concrete to be not too far apart. Therefore it is necessary to lift the box from the support surface, in such a way that the box is at the center of the slab and below and above can run the structural reinforcing bars which should be covered by at least 2 cm of concrete. |
| |
|
|
|
|
| |
 |
|
|
For this type of installation, choose a TEKPFRING accessory that can hold the grill |
| |
|
|
|
|
| |
 |
|
|
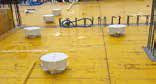
With this accessory the spotlight support box will be raised 5 cm from the surface of the concrete form (recommended height to allow for the concrete to cover the reinforcing bars sufficiently) |
| |
|
|
|
|
| |
 |
|
|
The reinforcing bars can therefore be placed close together and the efficiency of the finished structure will not be adversely affected. |
| |
|
|
|
|
| |
 |
|
|
pour the concrete and after that, disarming, we would find the hole, on the new realised ceiling. |
| |
|
|
|
|
| |
 |
|
|
If necessary, it could be possible to apply the compensation grids deciding the size of the holes and the sizes of the spotlights to be installed, cutting the grid to the necessary sizes |
| |
|
|
|
|
| |
 |
|
|
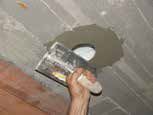
A subsequent shaving with glues tiles or glue for normal plasteboardwill allow hiding the remaining grill, leaving space for the perfect hole required.
|
| |
Caution: Do not use lime plaster and cement directly on the grill, make always and firstly the shaving as a support. |
| |
|
|
|
|
| |
 |
|
|
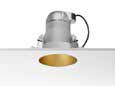
and lastly install the spotlight on the frame covered in the grill shaving.
The spotlight will therefore be installed exactly as it is installed in the plasterboard. |
| |
|
|
|
|